Dashboard Embedding is an add-on available on the Enterprise and Professional plans. The feature is included in a trial of the Professional plan. Existing customers interested in trying out Dashboard Embedding can also contact us.
Overview
Now that you have all the required information from Step 1: Preparation, it's time to dive into the deployment process.
We have organized the dashboard embedding process into a series of four steps:
- Create a guest token
- Supply a guest token to front-end
- Install the Preset embedded SDK
- Embed the dashboard using the SDK
Before starting, we highly recommend you initially review the Preparing your System for Embedding section below.
Have fun!
Preparing your System for Embedding
A strong system will have safeguards built in at multiple levels. With that in mind, it is important to take whatever protective steps you can when using embedded dashboards to expose data outside your organization.
The following precautionary measures are advised:
- Ensure that the database connections Preset uses to display your dashboards have the minimal necessary access. This could mean using a separate physical database, or a limited role, schema, or some other construction, depending on your data architecture.
- Use a separate Preset Workspace for embedded analytics than the ones you use for internal business analytics or other purposes.
1: Create Guest Tokens (Back-end)
A guest token authenticates an embedded user to access a Preset dashboard in embedded mode (through your application). This token defines the data the user should have access to.
There are two ways to generate a guest token:
- Using the Preset API
- Generating a
jwttoken in your backend using a private PEM key
The Preset API provides a simpler way to generate the token, however it requires using an API key with Admin access in the team level. Organizations looking to allow non-admins to create guest tokens can generate an encoded jwt using a private PEM key (by providing the public PEM key to the Workspace).
Using the Preset API
The following steps require Team Admin role.
Guest tokens are created by calling the Manager endpoint POST https://api.app.preset.io/v1/teams/<TEAM NAME>/workspaces/<WORKSPACE NAME>/guest-token/ from your back-end service.
To make this request, you will first need to authenticate with the Preset API and get an access token. Access tokens have a short lifetime of a few hours, so in a long-running service, they’ll need to be refreshed periodically using your API Key.
Token creation must only be done in a trusted back-end execution context. Never expose your Preset API Key or your Preset Access Token!
Example:
"""
Preset Manager API authentication
Retrieves a jwt token using your API credentials
"""
auth_payload = json.dumps({
    "name": "API_token",
    "secret": "API_secret"
})

auth_response = requests.post(
    "https://api.app.preset.io/v1/auth/",
    data = auth_payload
).json()

preset_jwt_token = auth_response["payload"]["access_token"]

"""
Embedded Guest Token generation
Generates a guest token to be used by the Embedded SDK
"""
embedded_payload = json.dumps({
    "user": {
        "username": "example_username",
        "first_name": "First",
        "last_name": "Last"
    },
    "resources": [{
        "type": "dashboard",
        "id": EMBEDDED_DASHBOARD_ID
    }],
    "rls": [],
    "enable_drilling": false,
})

embedded_response = requests.post(
    "https://api.app.preset.io/v1/teams/<TEAM NAME>/workspaces" +
    "/<WORKSPACE NAME>/guest-token/",
    data=embedded_payload,
    headers={ "Authorization": "Bearer " + preset_jwt_token }
).json()

guest_token = embedded_response["data"]["payload"]["token"]
A complete example Flask app can also be found in this repository.
Explanation of the fields used in the /guest-token endpoint:
user(Required): Profile info about the user viewing the dashboard. Theusernamefield should be unique for each user.resources(Required): A list of the dashboards the user will be allowed to see (multiple IDs are allowed).rls(Required): Specify a list of row-level security rules that will apply to the bearer of this token. Row Level Security applies additionalWHEREclauses when querying a dataset for this user (such as when a chart is viewed). Some things to know:- A rule can have an optional
dataset: idparameter if you only want it applied to a certain dataset. - Example clauses:
"publisher = 'Nintendo'","location_id = {warehouse.id}","NOT events.is_secret", andteam_id = {team_id}. - If you list multiple rules, they are joined in SQL using
AND. If you want to useORor similar clause, it should be enclosed within the quotations - Jinja templating
 can be used in the RLS clause for further customization.
- A rule can have an optional
enable_drilling(Optional): Boolean to enable/disable drilling actions for the user. Set tofalseby default.
- Without a dataset parameter, a rule will be applied to all datasets. This is pretty convenient, but beware of introducing errors by referencing a column that does not exist in one of the datasets backing your dashboards.
- Do not insert untrusted input into RLS clauses (e.g., such as information submitted to your app from a form, or from an external service). This would open up your analytics database to SQL injection attacks.
For context, here is an example payload which authenticates a user to access two dashboards. The user has three RLS rules applied to them:
{
  "user": { # User information. Make sure to use a unique `username` value per user
    "username": "grace_hopper",
    "first_name": "Grace",
    "last_name": "Hopper"
  },
  "resources": [ # Specify the dashboard(s) the user should have access to
    { "type": "dashboard", "id": "7dc26b42-fd38-4965-8f60-e156ae233f6d" },
    { "type": "dashboard", "id": "d12678ae-b001-4f97-9822-a6bdf893e97c" }
  ],
  "rls": [ # RLS rules that should be applied
    { "clause": "username = 'grace_hopper'" }, // this rule applies to all datasets
    { "dataset": 16, "clause": "environment = 'production'" },
    { "dataset": 42, "clause": "state = 'published'" }
  ]
}
Using a private PEM key
Any user with access to the private PEM key can generate a guest token.
You can use the openssl software library to generate the private/public PEM keys. Use below commands after installing it:
To create the private key:
openssl genpkey -algorithm RSA -out $private_key_name.pem -pkeyopt rsa_keygen_bits:2048
Replace:
$private_key_namewith the name that should be used to store the private key.
To create a public key for the private key:
openssl rsa -pubout -in $private_key_name.pem -out $public_key_name.pem
Replace:
$private_key_namewith the same name used in the previous command.$public_key_namewith the desired name to store the public key.
To copy the public key content:
pbcopy < $public_key_name.pem
Replace:
$public_key_namewith the name used for the public key.
Lastly, a Team Admin needs to add this public key to the Workspace Settings. To do so:
-
Access Preset Manager.
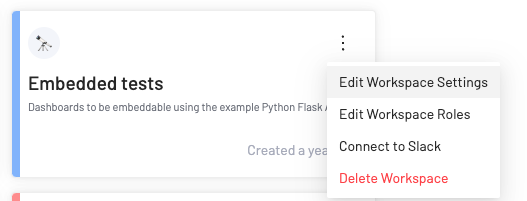
-
Click on the three ellipses for the desired Workspace > Edit Workspace Settings.
-
Navigate to the Embedded tab.
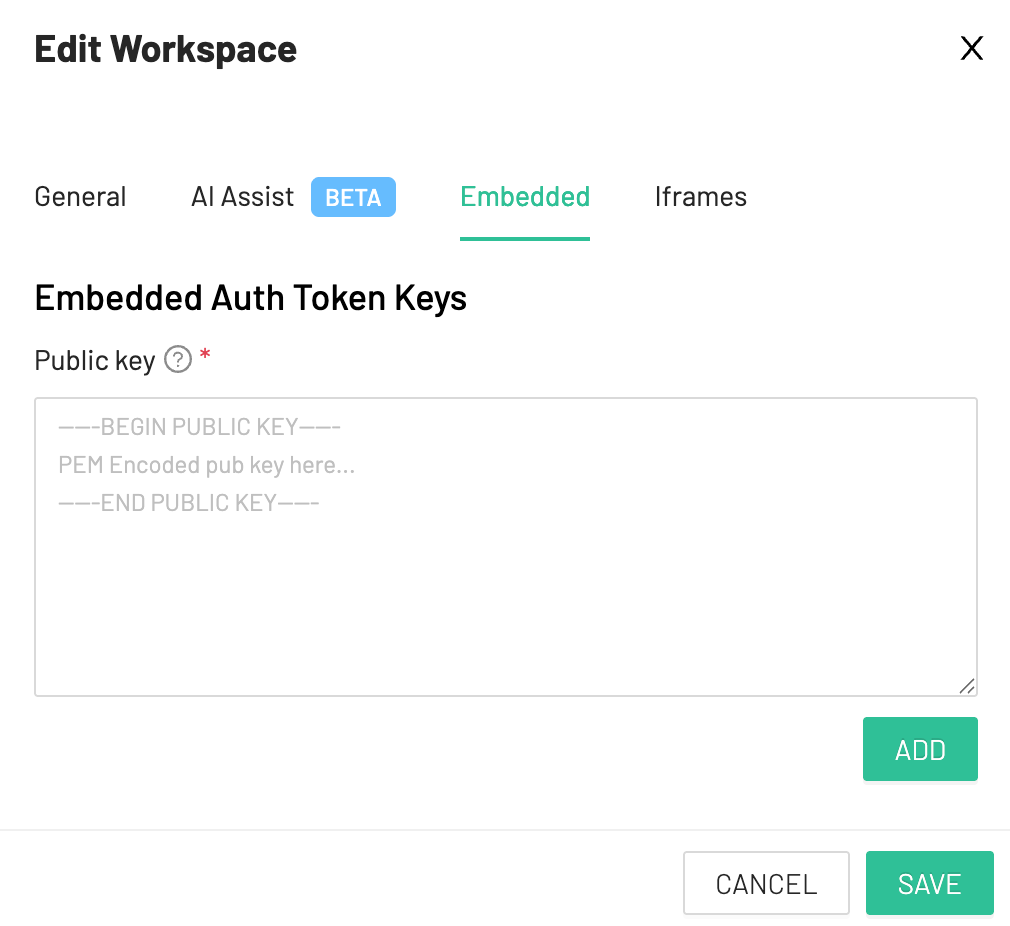
-
Paste the key and click on ADD.
-
Copy the Key Id and click on SAVE.
Below payload can be used to encode the jwt:
{
    "user":
    {
        "username": "example_username",
        "first_name": "First",
        "last_name": "Last"
    },
    "resources": [
    {
        "type": "dashboard",
        "id": EMBEDDED_DASHBOARD_ID
    }],
    "rls_rules": [],
    "enable_drilling": false,
    "type": "guest",
    "aud": WORKSPACE_ID,
    "exp": UNIX_TIMESTAMP
}
This is an example code of encoding this payload to a jwt:
import jwt
from datetime import datetime, timedelta, timezone

# Load the content of the PEM key that should be used to encode the jwt
with open('embedded_private.pem', 'r') as f: # Specify the path to the PEM private file
    PRIVATE_KEY = f.read()

key_id = "123456789e2b49d0" # Key ID from the Preset UI

@app.route("/generate-guest-token", methods=["GET"])
@login_required
def get_guest_token():
    """
    Generates a guest token to be used by the Preset SDK
    """

    # Payload to encode
    payload = {
        "user": { # User information. Make sure to use a unique `username` value per user
            "username": "grace_hopper",
            "first_name": "Grace",
            "last_name": "Hopper"
        },
        "resources": [ # Specify the dashboard(s) the user should have access to
            { "type": "dashboard", "id": "7dc26b42-fd38-4965-8f60-e156ae233f6d" },
            { "type": "dashboard", "id": "d12678ae-b001-4f97-9822-a6bdf893e97c" }
        ],
        "rls_rules": [ # RLS rules that should be applied
            { "clause": "username = 'grace_hopper'" }, # this rule applies to all datasets
            { "dataset": 16, "clause": "environment = 'production'" },
            { "dataset": 42, "clause": "state = 'published'" }
        ],
        "type": "guest",
        "aud": "012e4a5e", # The Workspace ID
        "exp": datetime.now(timezone.utc) + timedelta(minutes=5), # PyJWT converts this to a Unix timestamp automatically
    }

    encoded_jwt = jwt.encode(
        payload,
        PRIVATE_KEY,
        algorithm="RS256",
        headers={"kid": key_id}
    )

    return json.dumps(encoded_jwt)
You can control the token expiration time via the exp property. Note that the SDK will automatically fetch a new token accordingly to the value used, to avoid any errors for users with a longer session.
Not including an exp property would result in creating Guest Tokens that are valid forever.
2: Supply Guest Tokens to Front-end
The token created by the back-end will need to be passed to the front-end before your end user can view a dashboard.
You can perform this transfer in whatever way is appropriate for your application. The typical way is to expose an internal HTTP endpoint that authenticates your user, and creates and returns the guest token.
Here is an example Python / Flask endpoint building on the example from before:
@app.route("/guest-token", methods=["GET"])
@login_required
def get_guest_token():
    payload = json.dumps({
        "user": {
            "username": g.user.username,
            "first_name": g.user.first_name,
            "last_name": g.user.last_name
        },
        "resources": [{
            "type": "dashboard",
            "id": EMBEDDED_DASHBOARD_ID
        }],
        "rls": [
            { "clause": f"user_id = '{g.user.id}'" }
        ]
    })

    token_response = requests.post(
        "https://api.app.preset.io/v1/teams/<TEAM NAME>/workspaces/<WORKSPACE NAME>/guest-token/",
        data=payload,
        headers={ "Authorization": preset_access_token }
    ).json()

  return token_response["payload"]["token"]
Your code can decide which users should be granted guest tokens. You can also define row-level security rules in the rls parameter to dynamically determine the data that will be displayed to each user.
You will need to determine what the rules should be for your unique application, dashboard, and dataset, so that only the appropriate data will be displayed to your users.
The RLS rule defined above shows how you could filter dashboard data per-user based on their ID. For another example, if your users belong to an organization and should only see their organization’s data, you might write an RLS rule like:
{ "clause": "organization = {user.organization}" }
For this implementation to work properly, you need to have the expected organization (or user id) values in your database table.
3: Install the Superset Embedded SDK (Front-end)
From NPM:
npm install --save @preset-sdk/embedded
From a CDN:
You can load the SDK as a script in your HTML, if preferred. The SDK will be available as presetSdk globally:
<script src="https://unpkg.com/@preset-sdk/embedded"></script>
4: Embed the Dashboard Using the SDK
When using ES6 imports or a build tool:
import { embedDashboard } from "@preset-sdk/embedded";

embedDashboard({
    id: "<EMBEDDED_DASHBOARD_ID>", // from the Embedded dialog
    supersetDomain: "<Superset Domain>", // from the Embedded dialog
    mountPoint: document.getElementById("my-superset-container"), // any HTML element that can contain an iframe
    fetchGuestToken: () => fetchGuestTokenFromBackend(), // function responsible to return a guest_token
    dashboardUiConfig: {}, // dashboard UI configuration. Options: hideTitle, hideChartControls, filters.expanded, urlParams (all optional)
    referrerPolicy: "strict-origin-when-cross-origin", // ensure the Referrer header is included in the request for the allowed domain(s) validation
    iframeTitle: "Preset Embedded Dashboard", // optional: title for the iframe
});
Using a script tag with CDN:
<script>
    presetSdk.embedDashboard({
        id: "<EMBEDDED_DASHBOARD_ID>", // from the Embedded dialog
        supersetDomain: "<Superset Domain>", // from the Embedded dialog
        mountPoint: document.getElementById("my-superset-container"), // any HTML element that can contain an iframe
        fetchGuestToken: () => fetchGuestTokenFromBackend(), // function responsible to return a guest_token
        dashboardUiConfig: {}, // dashboard UI configuration. Options: hideTitle, hideChartControls, filters.expanded (all optional)
        referrerPolicy: "strict-origin-when-cross-origin", // ensure the Referrer header is included in the request for the allowed domain(s) validation
        iframeTitle: "Preset Embedded Dashboard", // optional: title for the iframe
    });
</script>
SDK Configuration:
- The
fetchGuestTokenconfiguration should point to an async function that fetches a fresh guest token from the endpoint created in 2: Supply Guest Tokens. - The
dashboardUiConfigconfiguration receives an object containing options to alter the dashboard UI. Possible options include:
dashboardUiConfig: {
    // dashboard UI config: hideTitle, hideChartControls, filters.expanded (optional)
    hideTitle: false, // change it to `true` to hide the dashboard title
    hideChartControls: false, // change it to `true` to hide the chart controls (ellipses menu)
    filters: {
      visible: true, // set it to `false` to hide the filter bar entirely
      expanded: true, // change it to `false` so that dashboard filters are collapsed (for vertical filter bar only)
    },
    urlParams: { // URL parameters to be used with the ``{{url_param()}}`` Jinja macro
      param_name: "value",
      other_param: "value",
  },
- The
iframeTitleis an optional configuration that can be used to specify thetitlevalue for theiframeelement created. By default, the title isEmbedded Dashboard. - It's possible to specify additional Sandbox attributes to be added to the
iframethrough theiframeSandboxExtrasconfiguration. For example, to allow links to open in a new tab:
iframeSandboxExtras: ['allow-popups-to-escape-sandbox']
Adjusting the iframe size
You can get your embedded dashboards looking a bit more seamless by resizing the iframe so that the browser sizes the content window appropriately. The getScrollSize() method asynchronously returns the full width and height of the embedded dashboard page.
Example making the iframe poll the embedded page to fit its content:
const myDashboard = await embedDashboard();

setInterval(async () => {
    const { width, height } = myDashboard.getScrollSize(); // function that returns the value
    setCss(` // imaginary setCSS function. Replace with  whatever method of styling is standard in your application.
        .embedded-superset iframe {
            width: ${width};
            height: ${height};
        }
	`);
}, 1000);
About Embedded Authentication
A Preset guest token is what enables your users to access embedded Preset resources, such as dashboards, without having to log in to Preset normally. The guest token is used for all Workspace API calls made while viewing an embedded dashboard. It contains user profile data and all the permissions of the user.
Guest tokens have a short lifetime of 5 minutes, and need to be refreshed regularly. The refresh process is automatically handled by the SDK, by calling the function set for the fetchGuestToken property.
Guest tokens have no ties to the Preset user who set up your embedded dashboard. The permissions your application assigns a guest token at creation are the full set of permissions that the end user will have.