Overview
Your Preset Workspaces are created with two database connections by default:
Let's take a closer look on these.
The examples connection
Workspaces are created with a lot of useful dashboard examples, to demonstrate the capacity of the tool and a variety of visualizations. These assets are powered by the examples DB.
Your Workspace is set up with a read-only connection to this database, so you can also use this connection to:
- Run queries in SQL Lab to get familiar with the querying experience in Preset.
- Create virtual datasets.
- Create new charts and dashboards.
- Edit existing physical datasets to get familiar with the Preset Semantic Layer.
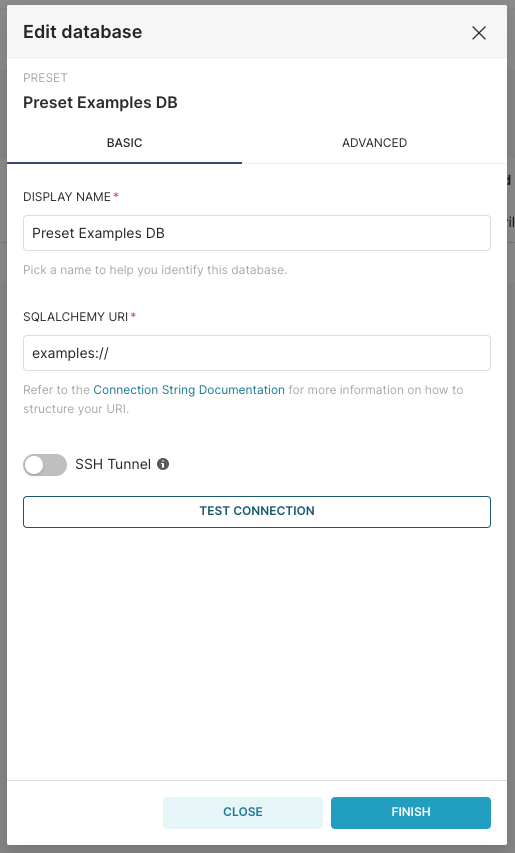
Re-creating the examples DB connection
Creating a database connection in the Workspace requires the Workspace Admin role.
In case you have deleted the connection, and want to re-connect it to expose sample data to your users, follow below steps:
- Access your Workspace.
- Navigate to Settings > Database Connections in the top navigation bar.
- Click in the + DATABASE button.
- Choose Other in the SUPPORTED DATABASES dropdown.
- Provide the desired name for the connection, and use
examples://as the connection string. - Click on CONNECT.
The File Uploads connection
It's possible to upload CSV files to a database connection, resulting in a new table in the database. Since the examples DB is connected to your Workspace with read-only credentials, it's not possible to upload files to this connection.
We completely understand the importance of validating Preset capabilities while using a data structure closer to your needs, so in case you can't connect your warehouse just yet, you can upload CSV files to this connection to validate your requirements.
How it works
- There's a total upload size limit of 100MB (this is for the total files uploaded per Workspace).
- Your CSV files are uploaded to an AWS S3 bucket, in the same AWS region as your Workspace.
- Preset uses a custom adapter to run SQL queries directly on these files. This integration layer simulates the DB Engine layer.
- The same encryption and isolation practices adopted to isolate Workspaces are applied to the files' isolation. You can have further details in our Security page.
- To delete an uploaded CSV file, run a
DROP TABLEcommand in SQL Lab. - Deleting the connection from your Workspace won't delete the CSV files. If you recreate the connection in the same Workspace, the files will still be available.
- Deleting the Workspace deletes all uploaded files associated with it.
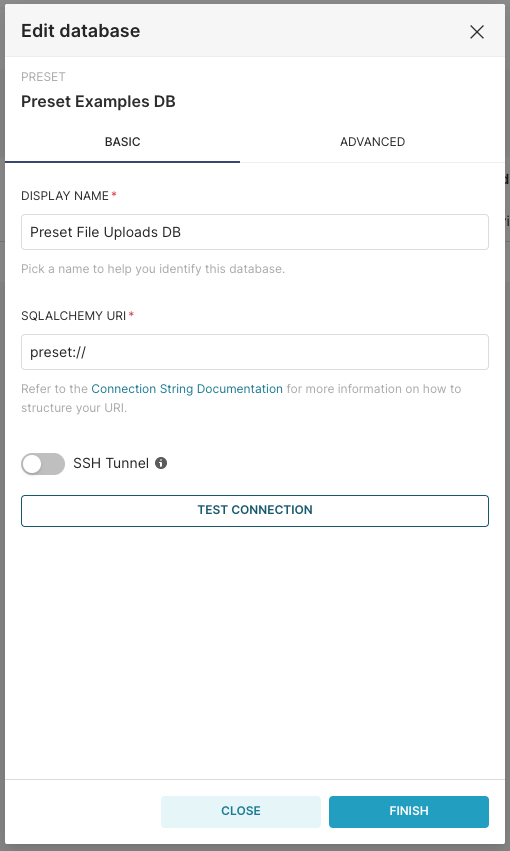
Re-creating the File Uploads DB connection
Creating a database connection in the Workspace requires the Workspace Admin role.
Follow below steps to re-create this connection in your Workspace:
- Access your Workspace.
- Navigate to Settings > Database Connections in the top navigation bar.
- Click in the + DATABASE button.
- Choose Other in the SUPPORTED DATABASES dropdown.
- Provide the desired name for the connection, and use
preset://as the connection string. - Click on CONNECT.
Checking storage consumption
Users can also check how much storage is still available from the 100MB limit in SQL Lab:
- Access your Workspace.
- Navigate to SQL > SQL Lab in the top navigation bar.
- Select the File Uploads connection in the DATABASE dropdown.
- Run below SQL query:
SELECT  (usage / 1000000.00) || 'MB' as "Used Storage"
        , ((quota / 1000000) - (usage / 1000000.00)) || 'MB' as "Available Space"
        , (quota / 1000000) || 'MB' as "Total Storage Size"
FROM csv_storage